Saturday, July 30, 2011

Photography Challenge: Week 1

As if I don't already have enough things to keep me busy, yesterday I decided on a whim to join the Photography Challenge at A Step in the Journey.  My picture taking skills definitely have some room for improvement and I love to fiddle around with Picnik and pretend to be artsy-fartsy, so why not?


My goal is to take, edit, and post one photo each week for 20 weeks.  Each week has a different theme.  The challenge kicks off this week with self portraits.  Here we go...

Week 1 - Self Portrait

I snapped this photo standing in my hallway, facing into the light streaming in through my patio doors.  I used the macro setting on my Sony Cybershot point and shoot camera.  I think you can see the reflection of the patio door in my eye.  Using Picnik, first I gave it a Boost, then added the Thermal Heat Map effect.  I like how my eyeball looks like one of those electric globes that makes your hair stand up when you touch it.  I only wish I had thought to curl my eyelashes before snapping the photo.  My lashes are really long and I think it would have made a nice frame for my eye.

Next week's theme...something that makes you smile.  So many possibilities!

Friday, July 29, 2011

Project Runway Wannabe

The new season of Project Runway started last night.  Yippee!  I haven't had a chance to watch it yet, but it's waiting for me in the DVR (best invention ever!).  Hopefully tonight my husband will relinquish control of the remote and I'll get some one on one time with Heidi and Tim.  A gal can only handle so much Tour de France coverage.


A few years ago, my mom told me about a Project Runway contest being sponsored by a DFW newpaper.  The challenge was to create an outfit for a Barbie using the contents of a large manila envelope supplied by the newspaper.  You were allowed to use your own thread and glue and could spend up to $2 on any additional supplies you may have needed as long as you provided a receipt. 

My envelope contained a couple of circles of tulle, a small bunch of plastic flowers, some really big rubber bands, a half dozen clear rhinestones, a piece of pink felt, and a balloon.  Very useful supplies.  I bought one spool of bluish purple ribbon for fifty cents at Hobby Lobby.  Time to make it work.

This is what I came up with...


I ripped apart the plastic flowers and hot glued them directly onto Barbie's bust.  What they say is true...beauty is pain.  The tulle circles became a skirt with a ribbon belt.  I also used the ribbon to tie up her crazy hair and to create a small clutch purse.  The rhinestones became part of the purse and a blingy diamond ring for her right hand.  Tim Gunn would be proud.

Shockingly, my creative brilliance didn't win the $100 prize.  Someone else probably used a toothpick and a old gum wrapper to create a couture ballgown for Heidi to wear to the Grammys.  Oh well, it was fun anyway! 

Auf Wiedersehen.  :)

Thursday, July 28, 2011

Home Again, Home Again, Jiggity Jig

Well, I have returned to the Lone Star State.  My trip to upstate NY was a success!  I had such a great time visiting my friend Robyn, meeting her family, and seeing all of the places that so far I've only known in pictures.  I ate the best fish sandwich of my life at Rudy's Lakeside Drive-in in Oswego.  Not only was the food delicious, the view of Lake Ontario was amazing. 


The Adirondack Mountains were beautiful.  We spent an afternoon shopping in Old Forge.  On my next trip, I would love to ride this train through the mountains...


I think the best part of the trip may have been this...


That's right folks...66 degrees.  A wee bit cooler than the 106 degrees that was waiting for me back home in Dallas.  I loved every minute of it.


The trip home had a few bumps along the way, including two broken airplanes and a pair of over-worked pilots, but I did eventually make it back to Texas safe and sound.  The bear poop candy that I brought back as a souvenir for my husband gave the TSA agent who searched my luggage quite a chuckle.  The flying was every bit as terrifying as I thought it would be, but I survived...and I would do it again if it meant I got to hang out with this chick again.  Thanks for a great vacation Robyn!  I miss you already!  :) 

Thursday, July 21, 2011

Leaving on a Jet Plane

In two days I will be taking a trip to Syracuse, NY.  This will be only my third time flying, and my first time to fly solo.  Did I mention that I'm absolutely terrified of flying?  Um, yeah.  I'm feeling a little queasy just writing about it.  But I am determined to conquer my fear of flying.  And hopefully I won't miss my connecting flight and get stranded in Washington DC.

The reason for my trip is to visit this gal...


That's me on the left, back when Bailey was not yet 2 years old and I didn't have any rogue grey hairs or a pesky forehead wrinkle.  That's Robyn on the right.  And yes that is indeed a cow wearing a holster, a cowboy hat, and lipstick behind us.  Welcome to Texas y'all!

Robyn and I met online over three years ago when our daughters were just babies.  We started chatting over a random blog post about spoon rests and the rest is history.  Over the past three years we've become very close, either chatting online or via text message nearly every single day.  She's become my long lost Yankee sister.  She is the cheese to my macaroni.


When Robyn made the journey to Texas two years ago to visit me, I made her do this...


No visit to Texas would be complete without having your picture taken on a longhorn in the Fort Worth Stockyards.  I also introduced her to Blue Bell ice cream and my mom's chicken fried steak.  She hasn't been the same since.

There is no telling what kind of trouble the two of us will get into this time around.  There has been mention of tattoos, but I'm hoping that's just a joke.  Although I'm a bit nervous about the flying, I'm really excited to finally meet her husband, her kiddos, and her dog.  And I'll be more than happy to leave behind these 100+ degree temps for the cooler weather in the Adirondacks.  NY here I come! 

Wednesday, July 20, 2011

Ruffled Rainbow Streamers


The thing that Bailey was the most excited about regarding her birthday party wasn't the presents.  It wasn't the cake either.  It was the decorations.  She must have asked me every single day for 2 months straight if there would be balloons and streamers at the party.  The balloons didn't exactly work out (a 45 minute wait for 6 balloons at the party store...um, no thanks), but the streamers were so awesome that she didn't care about the lack of balloons.  She was thrilled with the ruffly rainbows!


When I saw this tutorial on MADE way back in May, I knew that I wanted to try making these ruffled streamers for our birthday party.


These ruffled streamers were so easy to make!  I decided to layer three colors (red, yellow, and blue).  All you do it set the tension on your sewing machine to the highest setting (9 on my machine) and sew in a straight line.  It was a little tricky in the beginning to manage three strips at once, but I got into the groove pretty quickly and managed to create a long enough ruffled streamer to decorate my entire kitchen in about 15 minutes.  Piece of cake!

(these lasted about 2 minutes before he ripped them off)

My crepe paper was really thin, and I was pleasantly surprised to find that the red, yellow, and blue streamers created a rainbow effect when layered together.  Bonus!

(the ruffled streamers in action, over in the top left corner)

The rainbow streamers were so nifty that I really wanted to keep them after the party was over, but my husband mistakenly threw them away in a fit of helpfulness.  But hey, for $3 I can make some new ones for the next party...and I didn't have to clean up the kitchen after the party, so I'm not complaining!  :)

If you like it, 
Pin It

Monday, July 18, 2011

Muno! He's Tall and Friendly


There was a time not too long ago, when I had no idea who Muno, Brobee, Toodee, Foofa, Plex, and DJ Lance were.  Yo Gabba Gabba was just a crazy kids' show that Joel McHale made fun of on The Soup.  Even after my daughter was born, I was still clueless.  But then one day while strolling through the toy aisle at Target, it happened...


And so it began!  By the time she was three, Bailey had completely fallen head over heels for Yo Gabba Gabba.  As silly and weird as this show seems to adults, it really does teach a number of valuable lessons...always buckle up in the car, try new foods, don't say mean things to friends, and most importantly, don't bite your friends.


For Bailey's third birthday, I made her a set of Yo Gabba Gabba felt puppets...


This year's Yo Gabba Gabba birthday theme was an easy choice.  I wanted to continue the tradition of giving at least one handmade gift, but I had no idea what to make.  Then a few months ago, while on a routine (and by that I mean I feel compelled to go at least once a week) trip to Hancock Fabrics, I found a huge piece of red dot minky fabric hidden at the bottom of a big pile of remnants.  As soon as I saw it, a lightbulb went off....Muno!  He's the tall red cyclops with bumpy skin.  His shape seemed easy enough for even me to pull off.


Fast forward to 10:00pm the night before the birthday party.  My pattern making skills leave quite a bit to be desired and I was running short on time, so my Muno doll eventually transformed into a Muno pillow.  I used some scraps of black and white fleece for the eye and mouth.  In about 30 minutes, I had a soft and cuddly handmade gift.  He's the perfect companion for Bailey's Brobee pillow (purchased at Target in the kids bedding section).  Not exactly what I had in mind originally, but Jake and Bailey both love it, so I consider this a crafting success.  :)


Thursday, July 14, 2011

Somewhere Over the Rainbow

I've had so many people ask me for details about making the Rainbow Cake.  So today I'll explain a little bit more about how I made the magic happen.  Although it looks complicated, it was actually really easy!


Did I think to take pictures of the cake making process?  Of course not.  I was way too frazzled by this point in the party prep to remember to take pictures.  I'll simply explain the steps for building this awesome cake and show you the finished product, but this tutorial at Smart-Bottom Enterprises has excellent step-by-step photos of the entire process.


I started out by preparing two boxes of French Vanilla cake mix.  I used Betty Crocker, but any brand will work.  You could also use White cake mix, or any other flavor that has a whitish batter.  I should note that I added a package of Vanilla instant pudding mix and a half cup of sour cream to the cake batter, along with a tsp of vanilla extract.  I have found that this produces a nice moist cake.  Be careful not to over mix the batter since you will be mixing it even more when you add in the dye.

The next step is to evenly divide the batter into six small bowls.  It doesn't have to be exact, just eyeball it.  Now it's time to add in the dye to create the rainbow.  I used generic Target brand food coloring drops, but I have heard that Wilton gel coloring works well too.  Add dye to each of the bowls to create red, orange, yellow, green, blue, and purple batter.

My original plan was to mix the colors together in only three large 9 inch layers for a tie-dye effect.  The Rainbow Cupcakes I made a few weeks ago looked and tasted great, but when I found a set of six disposable 8 inch cake pans at the grocery store, I decided to change things up a bit and make a separate layer for each color rather than mixing the colors together.  I baked the layers two at a time at 350 degrees for 20 minutes.  After baking, I let the layers of cake cool in the pans overnight.


The next day I leveled each layer a bit, then stacked and frosted them using a quadruple batch of 
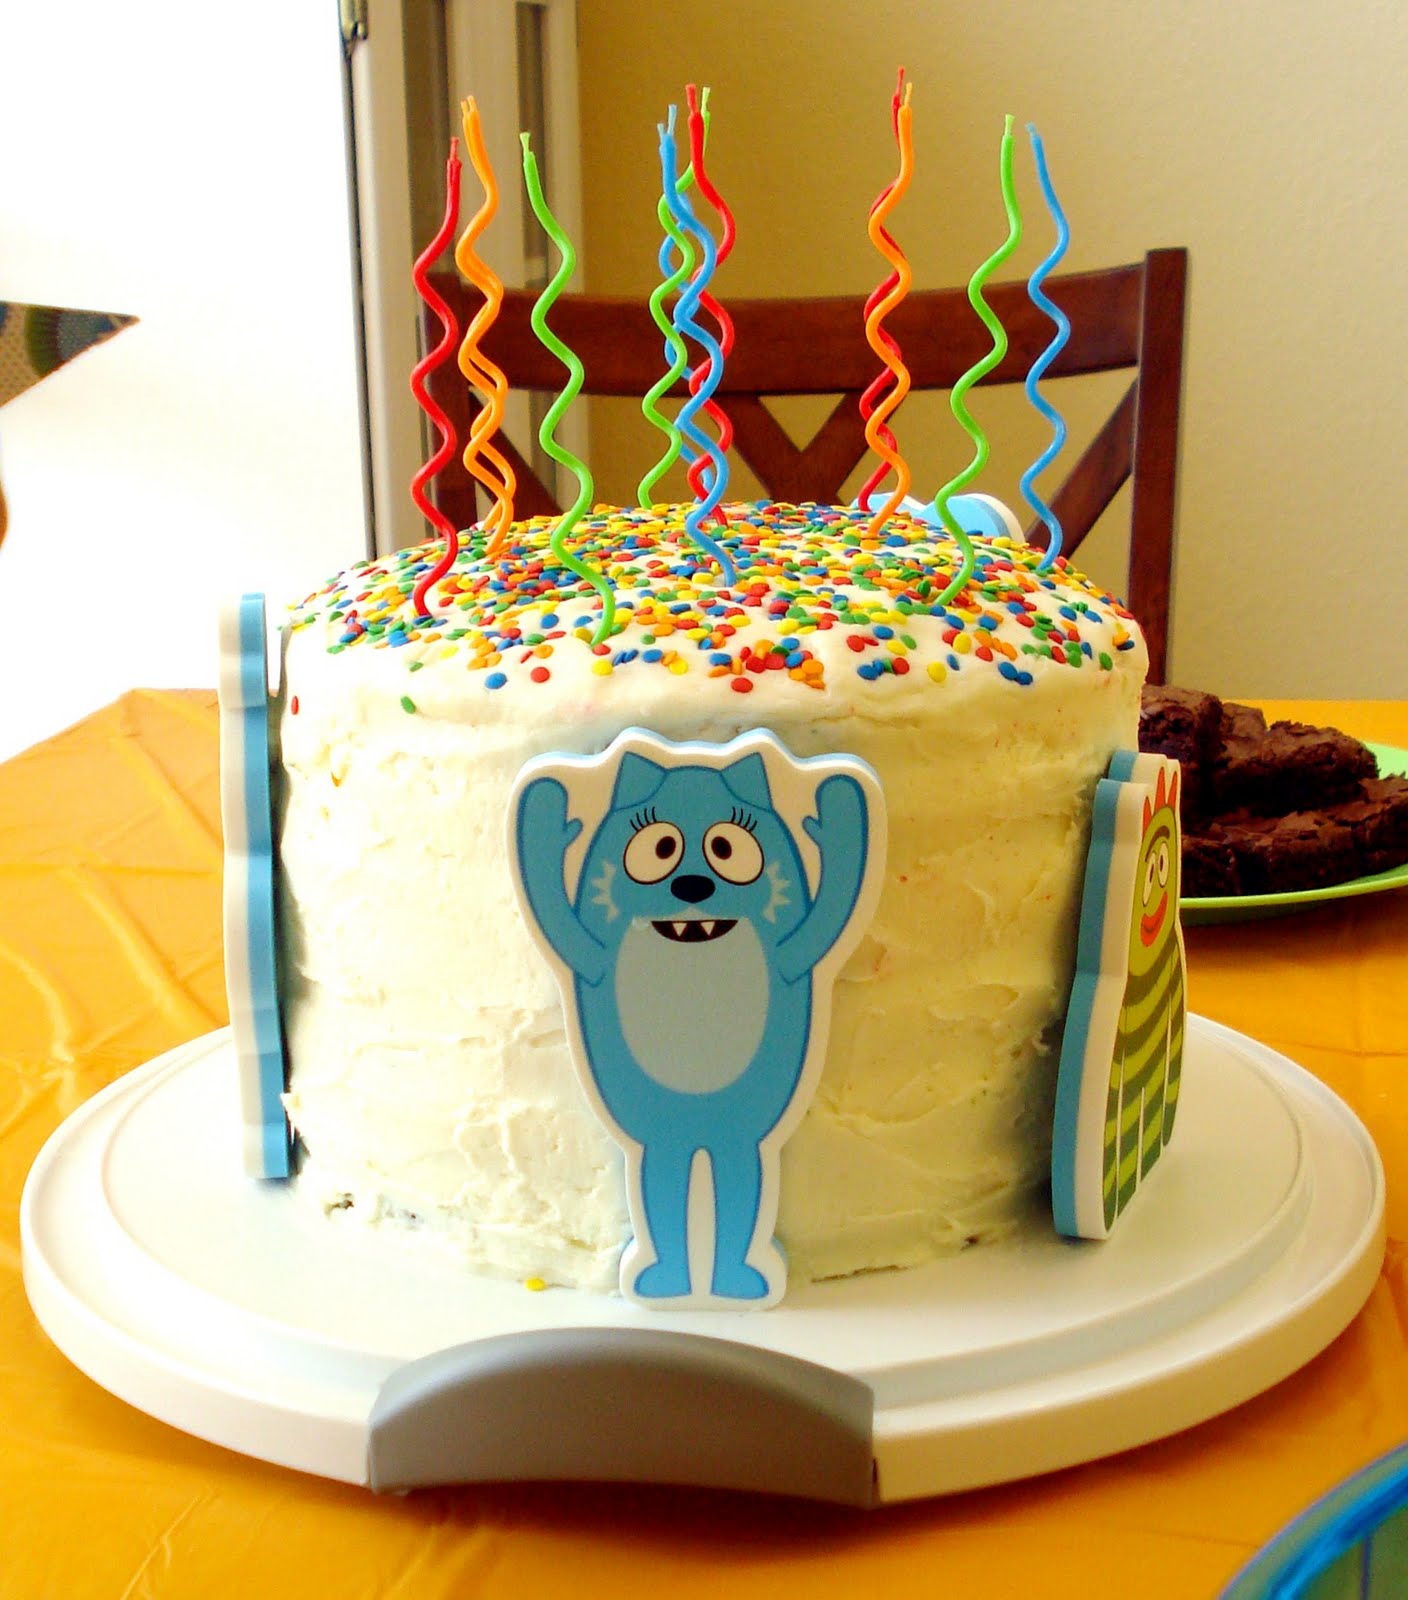
Vanilla Buttercream frosting.  I topped the cake with round Wilton sprinkles and a set of wacky, squiggly candles I found in the party aisle at Target.  The Yo Gabba Gabba characters I used to decorate the sides of the cake are actually bath toys I bought from Amazon.  I glued them to the sides of the cake using a small dab of frosting.  Voila!  A crazy cake perfect for a Yo Gabba Gabba party!


Not only did the cake look great, it also tasted great!  Everyone loved it.  It was definitely the hit of the party!


If you decide to make a Rainbow Cake of your own, I would love to hear about it and see photos...happy baking!  :)

If you like it,
Pin It

Wednesday, July 13, 2011

A Yo Gabba Gabba Double Birthday Extravaganza!

This past Saturday we had a birthday party for the kiddos, also known as The Yo Gabba Gabba Double Birthday Extravaganza!  I'll share more of the details in future posts, but for now I'd like to share some of my favorite photos from the party.  Enjoy!

There was a rainbow cake...


There were presents...


There was music and singing...


There was a very messy baby getting a bath in the kitchen sink...


And when the day was over, there were two very happy and exhausted kiddos...


And one very tired pug dog...

Tuesday, July 12, 2011

Time Flies When You're Having Fun...

It's hard to believe that as of this past Saturday this baby girl....


is now 4 years old.  She's beautiful, smart, quirky, and extremely funny...she takes after her mommy!  She loves to sing and dance, pretend to be a chef in her play kitchen, play dress-up, read books, put together puzzles, and do crafts.  She's my little Mini-Me.  She keeps me in stitches all day long (when I'm not pulling my hair out.)  I love this kid!


Happy 4th birthday Bailey Rose!

It's even harder to believe that this little guy...


will be 1 year old tomorrow!  Zoom!  That was the last year flying by at the speed of light.  This little dude is the most laid back, happy baby I've ever met.  He likes to hang upside down, dance to the theme song from Hawaii Five-0, and lately has discovered that he can put his big toe in his mouth.  He took his first steps last week...yea!  He love, love, LOVES his big sister. He's stubborn like his daddy, and even though I'm fairly sure he'll start quoting Shakespeare before he ever says "mama," I love this little rascal too.


Happy 1st birthday Jake!

The old saying really is true...time flies when you're having fun!  :)

Wednesday, July 6, 2011

A Star-Spangled Quilt

The photo featured in my last post was actually a block from a quilt that was made by my grandmother, GeeGee.  From time to time I'll share some of her creations with you.  When GeeGee makes a quilt, she does every single step completely by hand...no rotary cutters or fancy rulers, no sewing machine, no walking foot.  She uses the most basic tools...fabric, scissors, a needle, thread, a thimble, a quilt hoop, and the power of her own two hands, to create the most beautiful quilts.


I love nothing more than to call her up and talk quilts with her.


I received this red, white, and blue star quilt a few years ago as a Christmas gift from GeeGee.  It is one of my most treasured possessions.  I love the pattern, I love the color scheme, and I love knowing that she most likely stitched it while watching a Texas Rangers game (or maybe the Dallas Cowboys).


Love you GeeGee!  :)